Tag: food

To the pumpkin patch!

It’s fall again here and I couldn’t be happier! This is one of my favorite seasons and with it comes changing leaves, cool weather, cozy fires and my very favorite, trips to the pumpkin patch. Each year we drive down to Carpinito’s to play in … Read More

Hunger

I’m just back from Feast 2017, and am trying to find the words to describe my weekend away. Just like last year, I am in awe. I went with an empty belly and one goal: To try as many things as I possibly could. Good … Read More

Lemon Blueberry Jam

I’ll say it now and a million times again,

I. Love. Jam.

This is the time of year in the Pacific Northwest where berries and stone fruit are ripe and ready to be picked and savored immediately, or prepped to be set aside for the cold, dreary Seattle winters where you need to see some color. That time of year, you’re not going to be getting it from the sky, so it may as well come from the warm glow of something delicious!

This year I made a few jams-huckleberry, chipotle cherry, and my favorite lemon blueberry to have on hand over the winter. All have their place, whether it’s the huckleberry swirled into a cheesecake recipe I’ve got on the ready for this Easter, or the chipotle cherry slathered over a pork roast, with a splash of bourbon before roasting in the oven in the fall; but the lemon blueberry….it’s good on everything. Rich purple color, smooth and shiny texture; it screams summer. It comes together quickly and maintains it’s zip well into the doldrums of winter. You’re intrigued, right?  Sure, but I can hear you now though, but “Rai….canning is scary”!

Spoiler alert: it’s not. The key is to keep everything clean and hot and you’re good to go. Honest.

Ingredients:

2 lbs blueberries** washed, stems removed, and dried out ones removed
3 large lemons, juiced**
1 cup white, granulated sugar

**Shoot for organic where you can, and if you can hit up a blueberry patch and pick those bad boys yourself, you’ll save some money.

Equipment
4 pint jars with rings and lids, sterilized
Heavy bottomed pot, large enough to hold all of your berries and lemon juice
Large pot, tall enough to cover the cans by at least a few inches.
Jar grabbers
Kitchen towels-1 for clean up, one for setting your hot jars on
Pot holders
Ladle, or a deep spoon

Method:

  • Start by prepping your canning supplies-a tip: if it’s going to touch your jam, wash it. Easy, right?
  • Next, Fill your pot up with water, shooting for at least 2 times the height of your jar. When you process these bad boys, the water will need to cover the jars fully. Turn the heat on high. You’ll use this to sterilize your jars and bands.
  • Now, clean your jars! Even if I just opened the box and even if I washed the jars, bands and lids before storing, I wash them all again with a clean washcloth with hot and soapy water. Washing everything is a great time to make sure your jars do not have any chips or cracks-this could prevent sealing of your lids (no one wants mold or botulism), or cracking during processing.
  • Rinse your jars, bands, and lids to remove all the soap.
  • Set your lids aside in a clean bowl and place the jars and the rings carefully in your pot. **You don’t want to boil your lids. This can prevent the lids from sealing.
  • Now that you’re sterilizing everything, it’s time to make that jam!  In a heavy bottomed pot, combine the lemon, sugar, and blue berries and cook over medium-low heat for approximately 30 mins, stirring every few minutes to avoid sticking (and the dreaded burning), until most of the berries have fallen apart and turned into what resembles syrup.
  • You have a few options on what to do from here (yes, jam making is like a Pick Your Own Adventure book). You can keep going, letting that jam cook down even more or you can get ready to can it. I personally like little bits of fruit in my jam and less of a jelly texture. If you’re happy with the consistency, you’re ready to move to filling your jars; if not, continue cooking your jam down another 10 minutes, or until it’s the consistency you want. Keep in mind though, the more you cook it, the less you’ll have as a finished product!
  • By now, your jars have been bubbling away in the hot water and are all ready for your jam, so it’s time to prep your canning area. I lay a towel on the counter, which keeps my jars from moving around, but it also catches the spills I inevitably make. Set your pot of jam on a pot holder next to the towel. This makes for faster work pouring everything.
  • Remember that bowl with the lids? Get ready to pour hot water over them.
  • With your jar grabbers, carefully lift the first jar out of the hot water and pour some of that hot water over the lids until they are fully submerged.
  • Pour the rest of the water out of the jar, back into the pot and set your empty jar on the towel. Empty the other jars back into the pot and set them all on the towel. It’s ok if there’s a few drops of water in the jars, it won’t do anything to your finished product.
  • Slowly ladle or spoon the jam into each jar until they are filled up with 1/4 inch head space (room) from the top of the jar.
  • Take your other towel (or a paper towel), get it damp and wipe off the tops of the jars to remove any stickiness. Stickiness prevents a good seal folks.
  • I like to give a gentle tap to my jars, once filled, to get rid of any air bubbles. Be gentle though, you just heated that glass up!
  • Drain your lids from the bowl of water and place them on top of the jars and place the rings on, and finger tighten. The jars are going to be pretty hot still, so use a pot holder to avoid the hot glass.
  • Using your jar grabbers, gently place your jars back into the hot water filled pot and process (boil) for 15 minutes.
  • Once done, lift them out of the boiling water with your jar grabbers and let rest for 24 hours. The center of the lid should not bounce if pressed.
  • Store for a year with the rings removed, and eat whenever you’re ready!

Easy enough, right?  This is delicious over ice cream, in yogurt, or on toast. Ok, it’s really good eaten with a spoon, right out of the jar.

So there you are! A bit of sunshine in a jar, ready whenever you are.

Yours in a jam,
Raina

Feast Portland-Get Ready to Eat

There are few moments in life where I have been completely and utterly full, but still longing to eat more, to savor just one more bite of congee, or perfectly cooked lamb, or just one more sip of rum punch out of a fresh cracked … Read More

Giving Thanks

The holidays have officially kicked off and I’m considering breaking out the maternity pants like Joey on friends.  We’re gathered with family, the buzz of stories and laughter with the recordings of “Alice’s Restaurant” playing in the background. Dinner is cooking, and the house smells … Read More

Blue Cheese Butternut Squash Soup with Chicken and Mushrooms

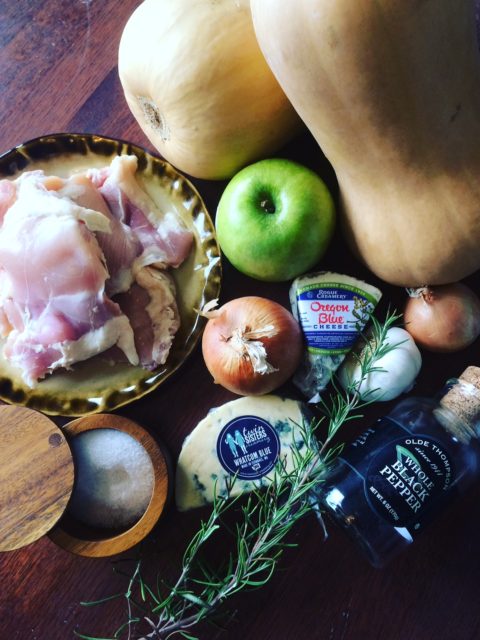
soup ingredientsFall hit here pretty quickly in Seattle; cool winds replacing the abnormally high summer temperatures. The leaves are changing and starting to fall and this week promises rain. I’ve been scurrying around the gardens, picking  the last of my tomatoes, hoping that whatever is still green has time to ripen. The air is crisp and the sun is setting earlier and earlier, which means it’s time for soup. Enter: my Blue Cheese Butternut Squash Soup with Chicken!

This recipe is flavorful, easy to make, and while it tastes rich, is surprisingly low in calories. You can add more ingredients to make it more hearty, but it’s perfect in its’ simplicity. I usually make a double batch, freezing half, to enjoy late into the winter when I am too tired to make a batch of soup. Roasting the vegetables in advance brings depth of flavor to the soup, but isn’t necessary if you’re in a rush for a bowl of warm, creamy comfort.

Let’s start by gathering our ingredients:

4-5 lbs of butternut squash, cut in half with seeds removed, and roasted (see prep notes)
2 lbs chicken thighs (breasts, if you’re wanting less fat/calories), cut into bite size pieces
1 cup white wine
64 ounces chicken stock
1 lb mushrooms
1 green apple, diced
3 medium yellow onions, diced and roasted (see prep notes)
1/2 head of garlic, peeled and roasted (see prep notes)
1-2 sprigs of rosemary
1 large bay leaf
1/2 lb of bacon, chopped, drippings reserved (substitute 2 Tbspn olive oil if you do not wish to use bacon)
Salt and pepper to taste (about a teaspoon each)
Low fat sour cream, for garnish
3-4 ounces blue cheese, sprinkled on top
Optional: 1/2 lb chopped kale for more heft and nutrients

Prep:
Roasting makes everything better-the flavors become more pronounced and it brings out a richness to the squash you wouldn’t get otherwise. To do this, coat a cookie sheet with olive oil and lay out your squash, roasting at 350 degrees for 50 minutes. While that cools, roast your onion and garlic for 10 mins at 350 degrees, or until  they start to turn golden. Set aside.

Cook:
In a heavy bottomed pot, fry the bacon until crispy, removing from the oil when done. Add your chicken pieces, and cook until browned. You can avoid using bacon and instead brown your chicken in 2 Tbsp olive oil if you wish (I love bacon, but this does add fat, sodium and calories to the dish). Pull out your chicken and set aside with the bacon.

See all those delicious bits on the bottom of your pan? You want those. All of those tasty bacon-chicken bits add flavor! Add 1 cup of white wine and scrape the bottom of the pot-the finished soup (and your belly) will thank you for deglazing everything!

Add your roasted squash to the deglazed pot by scooping the meat of the squash out of the skin. Add your onion, garlic, apple, salt, pepper and stock to the pot and let simmer for 20 minutes until  everything starts to fall apart, stirring occasionally. At this point, you have a choice-you can use an immersion blender to make everything creamy and smooth, or leave it as is for a soup with a little more texture-I prefer to blend the base, personally.  If you do opt to blend, pull out the rosemary and bay leaf.

If you’re using kale, now’s the time to add it, cooking for 15 minutes. If not, move to the next step.

Add your chicken, mushrooms and your bacon and continue to simmer for additional 20 minutes, or until your chicken is cooked through (no longer pink, registering 165 degrees, if you want to get technical).

Ladle into a deep bowl, adding blue cheese and sour cream. Enjoy!

That’s it!  This soup will taste like you spent hours making it, and will fill that craving for a warm delicious soup to warm you up as the weather changes. What could be better?

Note:
Some people do not like blue cheese and I get it!  It can be strong and for some, overpowering. If you fall into this camp, substitute Parmesan, adding the rind in when you’re cooking your kale and chicken and pulling out when you’re done cooking. Top with grated Parmesan at the end.

I want to thank Foster Farms for funding this post. Their Simply Raised chicken are raised without antibiotics, hormones, or steroids, which is important to my family. Additionally, they are American Humane Certified and local to WA, OR, and CA, so there’s less impact on the environment!  Foster Farms also has organic options, which are available at most larger grocers and Costco (again, who doesn’t love Costco?!). For more information on Foster Farms, their products or their practices, check them out here. Again, this post is sponsored by Foster Farms®, the opinions expressed are my own.

Yours in delicious fall flavors,

Raina
Feast, the recap!

I’ve been back a little while from Feast now, and I still can’t get over how amazing the whole time was. Was it that I had time to myself, or the chance to see old friends? Was it the late nights, fires, food and drink? Or … Read More

On the road to Feast Portland

I’m heading to Portland, y’all and I couldn’t be happier. 4 days solo, eating and drinking my way through Feast Portland, and visiting with friends. I can’t think of a better way to spend some hard-earned time off. I’ve been waiting for feast for months and … Read More

40 by 40

Happy 4th of July, all!  Tomorrow I turn 38. It’s not really a milestone birthday, but it is another year closer to 40. I’m pretty excited for that birthday, ushering in a new decade, closing out the old one. I’m excited to see that that looks and feels like. Every few years, I write a list of things I want to accomplish by a certain age, like this one I wrote before turning 35. I’m excited to share with you my list of things to accomplish in the next two years, my 40 by 40 list!

Before I get to that list, I have to share how things have gone so far!  This birthday week has been pretty darned good. I’ve been off seeing friends, getting things ticked off the to-do list, eating and drinking wonderful things. The highlight, however, had to be this-you know, just hanging out with these AMAZING birds! I didn’t expect when I went to a BBQ next door, that I’d get to pet a 40 day old owl and handle a falcon. I shouldn’t be surprised, this neighborhood always has magical things happening.

Raina and owl Izzy and owl falcon

The rest of the long weekend will be spent with friends, chatting about old times, sipping cold beers, and eating way too much. There will be hikes, and fireworks, hugs, and well-wishes, so much love and I can’t think of a better way to wrap up 37. I am truly lucky to have such a good life, with great people surrounding me. So, what will the next two years bring? Adventure, excitement, food and more happiness, I am sure based on how this past year has gone and by what I have planned in my new 40 by 40 bucket list!

My 40 by 40 List

1. Do something that scares me, often!
2. Go to Canlis
3. Finally get that tattoo!
4. Pay off a large bill-not super exciting, but getting rid of any bill is more cash for fun 🙂
5. Be more accepting of my body, strengths and flaws
6. Go overseas again/travel more
7. Continue to get in shape
8. Skate more
9. Learn to knit
10. Make sourdough, actually keep it alive for more than 1 week
11. Do 5 push ups, well. Yeah, I said it. 5.
12. Do more karaoke
13. Make a blood orange olive oil milkshake like the one at the Olive Pit, in California-so good!
14. Fix up the garage and make it into a studio
15. Raise rabbits
16. Make more quilts
17. Finish up my herbalism classes
18. Eat less processed foods
19. Rock climb again
20. Hunt a deer and properly butcher it
21. Write more (hmmm…check?)
22. Make cheese
23. Go clam digging
24. Set up a friend version of Outstanding in the Field.
25. Teach Izzy to fish
26. Find more happiness-actively seek it out, and hold it tight
27. Successfully grow peas and carrots, and not little dinky ones
28. Bring Izzy backpacking
29. Take a photography class
30. Dance more
31. Build the fence that has been sitting in raw materials in my garage for 10 years
32. Kayak on Lake Washington
33. Ride in a hot air balloon
34. Go to Disneyland
35. Camp on a beach
36. Buy more nice knives
37. Teach more
38. Hike to a hot spring
39. Take a train ride
40. Read more

That’s it, my 40 X 40 list! What would you add?  Any of these that you’ve already done?

Yours in finding adventure,
Raina


Finding your tribe

Finding your tribe

No matter what you do, or where you go, having or finding your tribe helps. Wait…What’s a tribe? You know that group of people that get you, and you don’t have to explain what you’re up to? That’s your tribe! It’s a group of people … Read More